How do you unblock a condenser unit?
If you find yourself in a situation where your condenser unit is not working properly or is completely blocked, don’t panic. With a little bit of know-how and some simple steps, you can easily unblock your unit and get it back up and running in no time. This article will guide you through the process of unblocking your condenser unit and provide you with some easy solutions for common cooling system issues.
The first step in unblocking your condenser unit is to identify the source of the blockage. This could be anything from debris, such as leaves or dirt, to a malfunctioning part. Once you have identified the problem, you can proceed with the appropriate solution. It’s important to note that if the issue is beyond your expertise, it is best to call a professional for help.
Depending on the cause of the blockage, there are a few different ways to unblock your condenser unit. If the blockage is due to debris, you can start by turning off the power to the unit and clearing away any visible obstructions. Be sure to wear gloves and use a soft brush or cloth to gently remove the debris. It’s important to be careful not to damage any delicate parts of the unit while cleaning.
If the blockage is more severe or if you suspect a malfunctioning part, you may need to take additional steps. This could include checking and cleaning the condenser coils, inspecting the fan motor, or replacing any faulty parts. It’s important to consult the manufacturer’s instructions or seek professional advice before attempting any repairs yourself.
In conclusion, unblocking a condenser unit doesn’t have to be a daunting task. By following these easy steps and using the appropriate solutions for your cooling system issues, you can have your unit running smoothly again in no time. Remember to always prioritize safety and consult a professional if the problem is beyond your expertise. Stay cool and enjoy the comfort of a properly functioning condenser unit!
Troubleshooting a Blocked Condenser Unit
If you find that your condenser unit is not working properly, it could be due to a blockage. A blocked condenser unit can lead to inefficient cooling and increased energy consumption.
So, what should you do if you suspect that your condenser unit is blocked? The first step is to visually inspect the unit. Look for any debris, such as leaves, grass clippings, or dust, that may be blocking the airflow. If you see any obstructions, carefully remove them using gloves or a soft brush.
If the visual inspection doesn’t reveal any obvious blockages, the next step is to check the condenser coil. Over time, the coil can become dirty and clogged with dust and debris. A dirty condenser coil can restrict the airflow and impact the unit’s performance. To clean the coil, turn off the power to the unit and gently brush off the dirt and debris. You can also use a coil cleaner or a mixture of water and mild detergent to remove stubborn dirt.
In some cases, the blockage may be caused by a refrigerant leak. If you suspect a refrigerant leak, it’s best to call a professional HVAC technician to handle the repair. Attempting to fix a refrigerant leak on your own can be dangerous and may require specialized equipment.
Regular maintenance is key to avoiding blockages in your condenser unit. By keeping the area around the unit clean and performing routine cleaning and maintenance tasks, you can prevent blockages and ensure the unit operates efficiently.
In conclusion, troubleshooting a blocked condenser unit involves inspecting for visible blockages, cleaning the condenser coil, and contacting a professional for refrigerant leaks. By taking these steps, you can unblock your condenser unit and restore its proper functionality.
Identifying the Signs of a Blocked Condenser Unit
If you notice that your cooling system is not functioning efficiently, it may be a sign of a blocked condenser unit. The condenser unit is an important component of your cooling system, responsible for releasing heat from the refrigerant and allowing the air conditioner to cool your space.
To determine if your condenser unit is blocked, you can look out for several signs. Firstly, you may notice reduced airflow coming out of the unit. This can be due to debris, such as leaves, dirt, or grass, obstructing the airflow. Another sign is an increase in energy consumption. A blocked condenser unit requires more energy to cool your space, leading to higher energy bills.
Additionally, you may experience uneven cooling in your space. A blocked condenser unit prevents the refrigerant from properly absorbing heat, resulting in inconsistent cooling throughout your home or office. Moreover, if you hear unusual noises coming from the unit, it could be a sign of a blockage. These noises may include rattling, hissing, or banging sounds.
If you suspect a blocked condenser unit, it is important to address the issue promptly to prevent further damage to your cooling system. Regular maintenance and cleaning of the unit can help prevent blockages. However, if you are unsure how to do it yourself, it is recommended to seek the assistance of a professional HVAC technician.
By being aware of the signs of a blocked condenser unit, you can quickly identify and resolve any issues with your cooling system, ensuring optimal performance and energy efficiency.
Tools You’ll Need to Unblock a Condenser Unit
To unblock a condenser unit, you will need the following tools:
- A screwdriver
- A coil cleaning brush
- A garden hose with a sprayer attachment
- A vacuum cleaner with a brush attachment
- A broom or brush
- A bucket or container
- Gloves and protective eyewear
These tools are essential for the task at hand. With them, you can easily remove any debris or obstructions that are preventing the unit from working properly.
Here’s how you can use these tools to unblock a condenser unit:
- Begin by turning off the power to the unit to avoid any accidents.
- Use the screwdriver to remove the screws or fasteners that hold the protective cover in place.
- Once the cover is removed, use the coil cleaning brush to gently brush away any dirt, dust, or debris on the condenser coils.
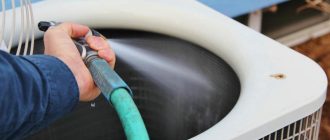
- Next, use the garden hose with a sprayer attachment to carefully rinse off the coils, removing any remaining debris.
- Use the vacuum cleaner with a brush attachment to clean out any debris that may have fallen inside the unit.
- Inspect the fan and blades for any obstructions and remove them if necessary.
- Finally, use the broom or brush to sweep away any dirt or debris around the unit.
- Dispose of any debris in the bucket or container.
By following these steps and using the necessary tools, you can effectively unblock a condenser unit and ensure that it functions optimally.
Step-by-Step Guide to Unblocking a Condenser Unit
If you notice that your cooling system is not working efficiently or is not cooling your space effectively, it may be due to a blocked condenser unit. A condenser unit is an essential part of your cooling system that helps remove heat from the air and keeps your space cool.
To unblock a condenser unit, follow these steps:
Step 1: Turn off the power: Before working on your cooling system, ensure that the power to the unit is turned off. This will help prevent any accidents or injuries.
Step 2: Locate the condenser unit: The condenser unit is usually located outside your home or building. It is a large metal box with a fan on top. Once you have located it, make sure there is no debris or obstructions around the unit.
Step 3: Remove the debris: Use a broom or a brush to carefully remove any leaves, twigs, dirt, or debris from the condenser unit. Be gentle to avoid damaging any delicate components.
Step 4: Check the fins: The condenser unit has metal fins that help dissipate heat. Inspect them to see if any are bent or damaged. If you notice any bent fins, use a fin comb to carefully straighten them out.
Step 5: Clean the coils: The coils in the condenser unit can accumulate dirt and dust over time, reducing their efficiency. Use a soft brush or a vacuum cleaner with a brush attachment to gently clean the coils. Be careful not to damage the coils during the cleaning process.
Step 6: Reassemble and test: Once you have completed the cleaning process, carefully reassemble the condenser unit. Turn on the power and test your cooling system to ensure that it is now running efficiently.
By following these steps, you can unblock your condenser unit and restore your cooling system’s performance. Regular maintenance and cleaning of your condenser unit can help prevent future blockages and ensure optimal cooling efficiency.
Cleaning the Condenser Coils
One important step in unblocking a condenser unit is cleaning the condenser coils. Over time, dirt, debris, and dust can accumulate on the coils, causing the unit to run inefficiently and potentially lead to system breakdowns. Cleaning the condenser coils is a relatively simple process that you can do on your own.
Here is how you can clean the condenser coils:
- Turn off the power: Before starting any cleaning, make sure to turn off the power to the condenser unit. This is crucial to avoid any electrical accidents.
- Remove debris: Use a brush or a vacuum cleaner to remove any debris, leaves, or grass that may have accumulated on the condenser coils. Be careful not to damage the fins.
- Clean with water: Gently spray water onto the condenser coils to remove stubborn dirt and dust. Avoid using pressure washers, as they can damage the delicate fins.
- Use a coil cleaner: If the coils are heavily soiled, you can use a coil cleaner specifically designed for this purpose. Follow the manufacturer’s instructions to ensure proper use.
- Rinse and dry: After cleaning the coils, rinse them thoroughly with water to remove any remaining cleaner or dirt. Allow the coils to dry completely before turning the power back on.
Regularly cleaning the condenser coils will help maintain the efficiency of your cooling system and prevent potential issues. It is recommended to clean the coils at least once a year or as needed, depending on the amount of debris in your area.
Removing Debris from the Condenser Unit
If you are experiencing issues with your cooling system, one of the first things you should check is the condenser unit. A common problem that can cause your condenser unit to become blocked is the buildup of debris. When the condenser unit becomes clogged with leaves, dirt, and other debris, it can hinder the proper airflow, resulting in reduced cooling efficiency and potential system damage. In order to help your cooling system function efficiently, it is important to regularly remove any debris from the condenser unit.
To remove debris from the condenser unit, you will need a few basic tools and materials. Firstly, you will need a soft brush, such as a broom or a brush with soft bristles, to gently sweep away any loose debris on the surface of the unit. Be careful not to damage any delicate components while doing this. Additionally, you will need a garden hose with a spray nozzle attachment to spray water on the unit and wash away any stubborn debris.
Here are the steps to unblock your condenser unit and remove debris:
- First, turn off the power to your cooling system by switching off the circuit breaker or disconnecting the power supply.
- Using the soft brush, gently sweep away any loose debris, such as leaves, grass, or dust, from the surface of the condenser unit. Be thorough, paying attention to the fins, fan blades, and any other accessible areas.
- Next, attach the spray nozzle attachment to the garden hose and turn on the water supply.
- Position yourself a safe distance away from the condenser unit and spray water on the unit, focusing on the areas where debris is most concentrated.
- Continue spraying water until all visible debris is washed away, ensuring that all areas of the condenser unit are thoroughly cleaned. If necessary, use a gentle stream of water to dislodge stubborn debris.
- Allow the condenser unit to dry completely before turning the power back on.
By regularly removing debris from your condenser unit, you can help ensure that your cooling system runs smoothly and efficiently. This simple maintenance task can prevent potential system damage and extend the lifespan of your cooling system. Remember to always exercise caution when working with electrical components and consult a professional if you are unsure or uncomfortable performing these steps yourself.
Unclogging the Condensate Drain Line
If you’re experiencing issues with your condenser unit, one common problem could be a clogged condensate drain line. This essential component of your cooling system is responsible for removing excess moisture and preventing water damage to your HVAC equipment.
To unclog the condensate drain line, you can follow these steps:
1. Turn off the power: Before performing any maintenance on your condenser unit, make sure to turn off the power to avoid any electrical accidents.
2. Locate the drain line: The condensate drain line is typically a PVC pipe that runs from the condenser unit to a nearby drain or to the outside of your home. It may be connected to a drain pan or a pump.
3. Inspect for blockages: Examine the drain line for any visible obstructions, such as dirt, debris, or algae growth. You can use a flashlight to get a clear view of the interior of the pipe.
4. Clear the blockage: Depending on the severity of the clog, you can try different methods to clear the condensate drain line. One option is to use a wet/dry vacuum to suction out the blockage. Another method is to use a long, flexible brush or a wire to manually remove the obstruction. Make sure to be gentle to avoid damaging the pipe.
5. Flush the drain line: After removing the blockage, you can flush the drain line with a mixture of equal parts water and vinegar. This solution helps to clean the pipe and remove any remaining debris or buildup. Pour the mixture into the drain pan or directly into the drain line and let it sit for a few minutes before rinsing with clean water.
6. Test for proper drainage: Once you’ve cleared the condensate drain line, it’s important to check if the water is flowing freely through the pipe. You can pour a small amount of water into the drain pan or directly into the drain line and observe if it drains away without any issues.
7. Regular maintenance: To prevent future clogs, it’s recommended to perform regular maintenance on your condensate drain line. This includes cleaning the drain line periodically, checking for any leaks or cracks in the pipe, and ensuring that the drain pan is properly positioned and draining correctly.
By following these steps, you can easily unclog the condensate drain line and restore proper functioning to your cooling system. However, if you’re unsure or uncomfortable performing these steps on your own, it’s always best to contact a professional HVAC technician for assistance.
Checking and Replacing the Air Filter
One of the first steps to unblock a condenser unit is to check and replace the air filter. The air filter is an essential component of the cooling system that helps to remove dust, debris, and other particles from the air before it enters the unit. Over time, the air filter can become clogged with dirt and obstruct the airflow, which can cause the condenser unit to work harder and decrease its efficiency.
To unblock the condenser unit, you should start by locating the air filter. The air filter is typically located near the blower motor or inside the return air duct. Remove the cover or access panel to gain access to the air filter.
Once you have removed the cover or access panel, carefully remove the old air filter from its housing. Take note of the size and type of the air filter so that you can purchase the correct replacement.
Inspect the old air filter for any signs of dirt, dust, or damage. If the filter appears to be dirty or clogged, it is recommended to replace it with a new one. A dirty air filter not only obstructs the airflow but can also lead to poor indoor air quality.
To replace the air filter, simply insert the new filter into the housing, ensuring that it is properly aligned. Secure the cover or access panel back in place.
Regularly checking and replacing the air filter is important for maintaining the efficiency and performance of the condenser unit. It is recommended to check the filter every 1-2 months and replace it as needed. This simple maintenance task can greatly improve the airflow and prevent potential issues with your cooling system.
Inspecting the Fan Motor and Blades
When your condenser unit is not cooling properly, one of the things you should check is the fan motor and blades. The fan motor is responsible for circulating air through the cooling system, and the blades help to move the air effectively.
To inspect the fan motor and blades, you will need to do the following:
- Turn off the power: Before you start inspecting any electrical components, make sure to turn off the power to the unit. This will help prevent any accidents or injuries.
- Access the fan motor: Locate the access panel on the condenser unit and remove it. This will give you access to the fan motor and blades.
- Check for obstructions: Inspect the fan blades for any dirt, debris, or other obstructions that may be preventing them from spinning freely. If you find any, carefully remove them.
- Test the fan motor: Once the blades are clear, you can test the fan motor to see if it is working properly. Turn the power back on and listen for any unusual noises or vibrations coming from the motor. If you notice anything out of the ordinary, it may indicate a problem with the motor that needs to be addressed.
- Inspect the motor bearings: If the fan motor is running but the blades are not spinning, the problem may lie with the motor bearings. Carefully inspect the bearings for any signs of wear or damage. If you notice any issues, they may need to be lubricated or replaced.
By inspecting the fan motor and blades, you can identify any issues that may be causing your condenser unit to not cool properly. If you are unsure how to perform these inspections or if you notice any serious problems, it is recommended to contact a professional HVAC technician for assistance.
Straightening Bent Fins on the Condenser Coil
If you notice that the airflow from your air conditioning unit is weak or not as cool as it should be, the problem may be caused by bent fins on the condenser coil. When the fins on the condenser coil become bent or flattened, it restricts the airflow and reduces the efficiency of the cooling system. Luckily, you can easily unblock the condenser unit by straightening the bent fins.
Here’s how you can straighten bent fins on the condenser coil:
- First, turn off the power to the air conditioning unit to avoid any accidents.
- Next, remove the protective panel or grille covering the condenser coil. This will give you access to the fins.
- Take a fin comb, which can be purchased at most hardware stores, and run it gently along the bent fins. Make sure to align the comb with the direction of the fins and apply even pressure.
- Continue combing the fins until they are straightened out. Be careful not to apply too much pressure, as this can cause further damage.
- Once the fins are straightened out, replace the protective panel or grille.
- Finally, turn the power back on and test the air conditioning unit to ensure that the airflow is restored.
Straightening bent fins on the condenser coil is a simple and effective way to unblock your air conditioning unit and improve its performance. By taking these steps, you can ensure that your cooling system is running efficiently and keeping your home cool during the hot summer months.
Removing Ice Buildup on the Condenser Unit
If you notice ice buildup on your condenser unit, it is important to take action as soon as possible to prevent further damage. Here’s what you can do:
1. Turn off the unit: Before attempting to remove the ice, make sure to turn off the condenser unit. This will prevent any electricity-related accidents and ensure your safety.
2. Identify the cause: Try to determine why the ice is building up on the condenser unit. It could be due to a variety of factors such as low refrigerant levels, a dirty air filter, or a malfunctioning fan motor. Understanding the cause will help you prevent future ice buildup.
3. Defrost the unit: Allow the ice on the condenser unit to melt naturally. Do not try to remove it forcefully, as this can damage the unit. You can speed up the process by placing a fan near the unit to help circulate warm air.
4. Inspect for damage: Once the ice has melted, carefully inspect the condenser unit for any signs of damage. Look for bent fins, loose wires, or leaks. If you notice any issues, it may be necessary to call a professional HVAC technician to repair or replace the damaged components.
5. Take preventative measures: To avoid future ice buildup, regularly clean or replace the air filter, check refrigerant levels, and keep the area around the condenser unit clear of debris. It is also a good idea to schedule regular maintenance visits with an HVAC professional to ensure the proper functioning of your cooling system.
By following these steps, you can effectively remove ice buildup on the condenser unit and prevent further cooling system issues.
Checking the Refrigerant Level
One of the common reasons for a condenser unit to become blocked is a low refrigerant level. If the refrigerant level is too low, it can cause the unit to freeze up or fail to cool properly. To unblock a condenser unit, you need to check the refrigerant level and ensure it is at the correct level.
To check the refrigerant level, you will need to follow these steps:
Step 1: Turn off the power to the unit. This is crucial for your safety as well as the integrity of the unit.
Step 2: Locate the access valves on the condenser unit. These valves are typically found near the condenser coils and are used to add or remove refrigerant.
Step 3: Use a refrigerant pressure gauge to check the pressure in the system. The pressure should fall within the recommended range provided by the manufacturer. If the pressure is too low or too high, it is a sign that the refrigerant level needs adjustment.
Step 4: If the pressure is too low, you will need to add refrigerant to the system. However, if the pressure is too high, it is likely that there is an overcharge of refrigerant, and you will need to remove some of it.
Step 5: After making any necessary adjustments, use the refrigerant pressure gauge to recheck the pressure and ensure it is within the recommended range.
By regularly checking the refrigerant level and making adjustments as needed, you can help prevent blockages in the condenser unit and maintain optimal cooling efficiency.
Testing the Capacitor
If you suspect that a blocked condenser unit is caused by a faulty capacitor, you can test it with a few simple steps. The capacitor is a crucial component in the cooling system, and if it is defective, it can cause the condenser unit to stop working effectively.
To test the capacitor, you will need a multimeter. Start by turning off the power to the condenser unit. You can do this by switching off the circuit breaker that supplies power to the unit. Remember, safety is important, so always take the necessary precautions while working with electrical components.
Once you have ensured that the power is off, locate the capacitor within the condenser unit. It is usually a cylindrical or oval-shaped metal object with wires attached to it. Carefully remove the wires from the capacitor, making note of their positions for reassembly later.
Set your multimeter to the capacitance setting and touch the test leads to the terminals on the capacitor. The multimeter should display a reading that is within the manufacturer’s specified range. If the reading is significantly below or above the specified range, it indicates a faulty capacitor that needs to be replaced.
If the capacitor is fine, you can proceed to check other components of the condenser unit, such as the fan motor or the contactor. Remember to always follow safety guidelines and work with caution. If you are unsure or uncomfortable with performing the tests, it is best to call a professional HVAC technician to do the job.
By testing the capacitor, you can determine whether it is the cause of the blockage in your condenser unit. If it is faulty, replacing it should help unblock the unit and restore its proper functioning.
Q&A:
Why isn’t my condenser unit working?
If your condenser unit is not working, it could be due to a variety of issues. It is possible that the unit is experiencing a power problem, such as a tripped circuit breaker or a blown fuse. Additionally, a dirty condenser coil could be blocking the unit from operating effectively. It is also important to check if the thermostat settings are correct or if there are any issues with the thermostat itself. Another possibility is that the condenser fan motor is faulty or if there are any issues with the compressor. If you are unsure about the problem, it is best to call a professional HVAC technician to diagnose and fix the issue.
How can I unblock my condenser unit?
To unblock your condenser unit, there are a few steps you can take. Firstly, make sure the unit is turned off before performing any maintenance. Then, carefully remove any debris, leaves, or other obstructions from around the unit. Next, clean the condenser coil using a soft brush or a coil cleaner. Additionally, check for any bent fins on the coil and straighten them out if necessary. Finally, make sure the area around the unit is clear to ensure proper airflow. If you are uncomfortable performing maintenance on your condenser unit, it is best to consult a professional.
What are the signs of a blocked condenser unit?
There are several signs that your condenser unit might be blocked. Firstly, if your air conditioner is running but not cooling your home, it could be a sign of a blocked condenser unit. Additionally, if you notice reduced airflow from the vents or hear unusual noises coming from the outdoor unit, it could indicate a blockage. A frozen or icing-up evaporator coil could also be a result of a blocked condenser unit. If you notice any of these signs, it is important to address the issue promptly to prevent further damage to your cooling system.
Can I unblock my condenser unit myself?
Unblocking a condenser unit can be done by yourself if you are comfortable performing basic maintenance tasks. As a safety precaution, make sure the unit is turned off before you begin. Clear any debris or obstructions from around the unit to ensure proper airflow. Use a soft brush or a coil cleaner to clean the condenser coil and straighten any bent fins. However, if you are unsure or uncomfortable with performing these tasks, it is best to call a professional HVAC technician. They have the necessary knowledge and experience to safely and effectively unblock the condenser unit.
How often should I unblock my condenser unit?
The frequency of unblocking your condenser unit will depend on various factors. In general, it is recommended to clean and maintain your condenser unit at least once a year, preferably before the hot summer months when your cooling system will be in high use. However, if you live in an area with heavy vegetation or if you notice a decrease in cooling performance, it may be necessary to clean the condenser unit more frequently. Regular maintenance and cleaning will help ensure that your condenser unit operates efficiently and prolong its lifespan.
What are the common reasons for a condenser unit to become blocked?
There are several common reasons for a condenser unit to become blocked. One reason is the accumulation of dirt, leaves, and other debris in the unit. Another reason is the buildup of ice or snow on the unit in colder climates. Additionally, the unit may become blocked if the fan is not functioning properly or if there is a refrigerant leak.