Step-by-Step Guide: How to Install a Tankless Water Heater
If you’re tired of constantly running out of hot water, it might be time to consider installing a tankless water heater. Not only can a tankless water heater provide you with endless hot water, but it can also save you money on energy bills in the long run.
In this comprehensive guide, we will walk you through the step-by-step process of installing a tankless water heater in your home. Whether you’re a seasoned DIY enthusiast or a novice, you can follow these expert installation tips to ensure a successful and efficient installation.
The first step in installing a tankless water heater is to choose the right location. You’ll want to select a spot that is close to the main water and gas lines, as well as near the fixtures you’ll be using the most. It’s important to ensure that the area is well-ventilated and can support the weight of the unit.
Once you’ve chosen the perfect location, the next step is to gather all the necessary tools and materials. This includes a pipe cutter, wrench, fittings, and a vent pipe. It’s also important to shut off the water and gas supply before starting the installation process.
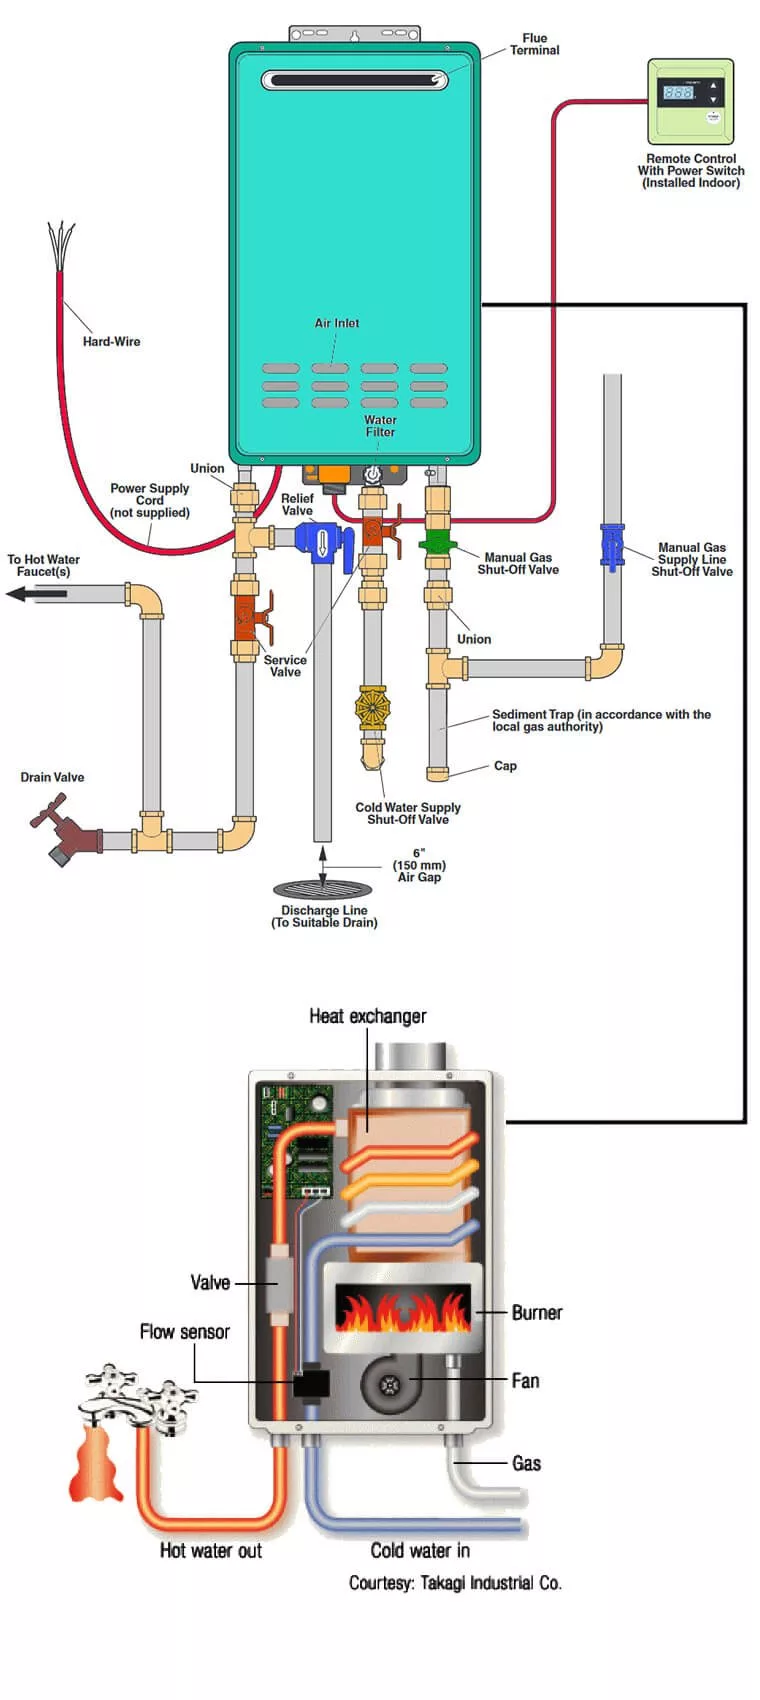
Now comes the most crucial part – connecting the water and gas lines to the tankless water heater. This step requires precision and careful attention to detail. It’s recommended to consult the manufacturer’s instructions or seek professional help to ensure a proper and safe connection.
Lastly, you’ll need to connect the vent pipe to the tankless water heater to safely remove combustion gases. This step is essential for the proper functioning of the unit and should not be overlooked. Once everything is properly installed, you can turn on the gas and water supply and enjoy endless hot water!
In conclusion, installing a tankless water heater can provide you with a consistent supply of hot water while also saving you money. By following this step-by-step guide and employing expert installation tips, you can successfully install a tankless water heater in your home and enjoy its benefits for years to come.
Benefits of Tankless Water Heaters
Tankless water heaters offer several benefits over traditional water heaters. Here are some of the key advantages:
|
1. Energy Efficiency |
Tankless water heaters are more energy efficient than traditional heaters because they only heat water when it is needed. This can result in significant energy savings over time. |
|
2. Space Saving |
Tankless water heaters are compact and can be installed in smaller spaces, saving valuable floor space in your home. They can even be mounted on a wall, freeing up even more space. |
|
3. Continuous Hot Water |
With a tankless water heater, you’ll never run out of hot water. These heaters provide a continuous supply of hot water, on demand, eliminating the need to wait for a tank to refill. |
|
4. Longer Lifespan |
Tankless water heaters have a longer lifespan than traditional heaters. On average, they can last up to 20 years, compared to 10-15 years for traditional heaters. This can save you money on replacement costs in the long run. |
|
5. Reduced Water Waste |
Traditional water heaters can waste a lot of water while waiting for it to heat up. With a tankless water heater, you don’t have to run the faucet as long, saving water and reducing your water bill. |
Overall, tankless water heaters are a great investment for any home. They provide energy efficiency, space savings, continuous hot water, a longer lifespan, and reduced water waste. Consider installing a tankless water heater today and start enjoying the benefits.
Choosing the Right Size of Tankless Water Heater
When it comes to choosing a tankless water heater for your home, size matters. It’s important to select a unit that is the right size for your household’s hot water needs. Installing a heater that is too small will result in insufficient hot water, while installing a heater that is too large will waste energy and money.
Here is a step-by-step guide to help you determine the appropriate size of tankless water heater for your home:
Step 1: Calculate your peak hot water demand.
In order to determine the right size of tankless water heater, you need to calculate your peak hot water demand. This is the maximum amount of hot water your household will require at any given time. To calculate this, consider the number of bathrooms in your home, the number of appliances that use hot water (such as washing machines and dishwashers), and the total number of people living in your household.
Step 2: Determine the temperature rise.
The temperature rise is the difference between the temperature of the incoming water and the desired hot water temperature. To determine this, measure the temperature of your incoming water and subtract it from the desired hot water temperature. The result is the temperature rise.
Step 3: Check the manufacturer’s sizing guidelines.
Each manufacturer provides sizing guidelines for their tankless water heaters. These guidelines take into account factors such as flow rate, temperature rise, and hot water demand. Check the manufacturer’s guidelines to ensure you select a heater that is appropriate for your peak hot water demand and temperature rise.
Step 4: Consider future needs.
When choosing a tankless water heater, it’s important to consider future needs. If you plan to add bathrooms, appliances, or additional residents in the future, it may be wise to select a larger size than what is currently needed. This will ensure that your hot water needs are met as your household grows.
Remember, choosing the right size of tankless water heater is essential to ensure an efficient supply of hot water for your home. By following these steps and considering your specific hot water requirements, you can make an informed decision and select the perfect tankless water heater for your needs.
Preparing for Installation
Before you begin the installation process for your tankless water heater, make sure you have all the necessary equipment and tools. You will need a pipe cutter, wrench, tape measure, level, and a drill. It’s also important to check the manufacturer’s instructions for any specific requirements or recommendations.
Next, turn off the water and gas supply to your existing water heater. This can typically be done by shutting off the main water supply valve and closing the gas valve. Be sure to drain the water from the existing heater to avoid any leaks during the installation process.
Once the water and gas supply are turned off, disconnect the existing water heater by disconnecting the water lines, gas line, and electrical connections if applicable. Use a wrench to loosen and remove the fittings and connections.
After the old water heater is removed, you can begin preparing the area for the installation of the new tankless water heater. Start by measuring the available space and ensuring that it meets the manufacturer’s clearance requirements. This can include vertical and horizontal clearances, as well as clearance from combustible materials.
If necessary, you may need to install a new venting system for the tankless water heater. This will depend on the location of the installation and the specific requirements of the heater. It’s important to use the correct type and size of venting materials to ensure proper ventilation.
Finally, ensure that the area where the tankless water heater will be installed is clean and free of any debris or obstructions. This will help to ensure optimal performance and efficiency.
With all the necessary preparations completed, you are now ready to move forward with the installation process. The next step is to follow the manufacturer’s step-by-step instructions to install your new tankless water heater.
| Equipment/Tool | Quantity |
|---|---|
| Pipe cutter | 1 |
| Wrench | 1 |
| Tape measure | 1 |
| Level | 1 |
| Drill | 1 |
Shut Off the Water Supply
Before you begin the installation process of your tankless water heater, it is important to shut off the water supply. This step is crucial to prevent any potential water damage or leaks.
Start by locating the main water shutoff valve in your home. This valve is typically located near your water meter or in the basement. Turn the valve clockwise until it is completely closed.
Once the water supply is shut off, open a faucet on a lower level of your home to relieve any remaining pressure in the pipes. This will help to prevent any water from spraying out once you disconnect the old water heater.
Remember to always use caution when working with water and plumbing. If you are unsure about shutting off the water supply, consult a professional plumber for assistance.
Disconnect and Remove the Old Water Heater
Before you can install your new tankless water heater, you’ll need to disconnect and remove the old water heater. Follow these step-by-step instructions to safely and efficiently complete this task:
- Turn off the power supply to the old water heater. This can typically be done by flipping the breaker switch in your electrical panel that controls the water heater.
- Shut off the water supply to the old water heater. Locate the main water valve in your home and turn it off to stop the flow of water to the heater.
- Open a hot water faucet in your home to relieve any pressure in the pipes.
- Attach a hose to the drain valve on the old water heater and place the other end of the hose near a floor drain or outside. Open the drain valve to allow the water to drain completely from the tank.
- Disconnect the water supply lines from the old water heater. Use a wrench to loosen the nuts connecting the hot and cold water lines to the heater.
- After removing the water supply lines, disconnect the gas line if your old water heater is gas-powered. This will typically require a wrench to loosen the connection.
- Remove the old water heater from its location. Depending on the size and weight of the heater, you may need assistance to safely lift and move it.
- Once the old water heater is removed, clean out any debris or sediment from the area where the new tankless water heater will be installed.
Following these steps will ensure that your old water heater is properly disconnected and removed, making way for the installation of your new tankless water heater.
Prepare Mounting Area for Tankless Water Heater
Before you begin the installation process, it is important to prepare the mounting area for your tankless water heater. Follow these step-by-step instructions to ensure a successful installation:
- Choose a suitable location for your tankless water heater. It should be near the point of use, such as a bathroom or kitchen, to minimize the distance hot water has to travel.
- Ensure there is enough space to safely install the water heater. Check the manufacturer’s guidelines for clearance requirements.
- Clear the area of any obstructions or debris that could interfere with the installation process.
- If necessary, consult a professional to assess and modify your home’s plumbing and gas line connections to accommodate the tankless water heater.
- Determine the best way to mount the water heater. It can be mounted on a wall, either vertically or horizontally, or installed on a stand.
- If mounting on a wall, use a stud finder to locate and mark the studs where you will attach the brackets or supports for the water heater.
- Install any necessary support brackets or stands according to the manufacturer’s instructions.
- Ensure the mounting area is level. Use a level to check for any unevenness.
- Securely attach the tankless water heater to the mounting area using the appropriate hardware.
By properly preparing the mounting area for your tankless water heater, you will ensure a safe and efficient installation process.
Connect the Water Lines
Once you have properly installed your tankless water heater according to the step-by-step guide, it’s time to connect the water lines. This is a crucial step in ensuring the proper functioning of your tankless water heater.
Here is a simple guide to help you connect the water lines:
- Locate the cold water inlet on the tankless water heater. This is typically marked with a blue-colored cap.
- Attach one end of a flexible water supply line to the cold water inlet of the tankless water heater.
- Tighten the connection using a wrench to ensure a secure fit. Make sure not to overtighten, as this could damage the connection.
- Next, locate the hot water outlet on the tankless water heater. This is typically marked with a red-colored cap.
- Attach the other end of the flexible water supply line to the hot water outlet of the tankless water heater.
- Again, use a wrench to tighten the connection, making sure it is secure but not overly tight.
It is important to note that some tankless water heaters may require additional connections, such as a pressure relief valve or a drain valve. Refer to the manufacturer’s instructions for any additional steps specific to your model.
Once you have connected the water lines, check for any leaks by turning on the water supply and inspecting the connection points. If you notice any leaks, tighten the connections further or use plumber’s tape to seal them.
With the water lines properly connected, you can now move on to the next steps of the installation process, such as connecting the gas supply or electrical wiring, depending on the type of tankless water heater you have.
Following this guide will ensure a successful installation and proper functioning of your tankless water heater. Enjoy the benefits of endless hot water and energy efficiency!
Install the Venting System
The venting system is a crucial part of installing a tankless water heater. It helps remove the exhaust gases produced by the heater and ensures proper ventilation. Follow this step-by-step guide to install the venting system:
- Determine the type of venting system required for your tankless water heater. There are two common options: direct venting and power venting. Direct venting uses a sealed combustion chamber, while power venting uses a fan to push the exhaust gases out.
- Measure the distance between the water heater and the exterior wall. This measurement will help determine the length of venting pipe needed.
- Choose the appropriate venting materials for your system. This can include vent pipes, elbows, termination caps, and other necessary components. Make sure to select materials that are compatible with your tankless water heater model.
- Install the vent pipe vertically from the top of the water heater to the ceiling or roof. Ensure the pipe is secured properly using brackets or straps.
- If using power venting, connect the fan to an electrical source and make sure it is functioning correctly.
- Route the vent pipe horizontally through the wall or ceiling to the exterior of the building. Use appropriate fittings and connectors to ensure a secure and airtight connection.
- Install the termination cap on the exterior wall. This cap prevents rain, debris, and animals from entering the vent pipe while allowing the exhaust gases to escape.
- Inspect the venting system for any leaks or gaps. Use high-temperature silicone or foil tape to seal any areas that require it.
- Test the venting system by turning on the tankless water heater and checking for proper exhaust flow and ventilation. Ensure there are no obstructions or backdrafting issues.
By following these steps, you can successfully install the venting system for your tankless water heater. It is important to consult the manufacturer’s installation instructions and local building codes to ensure compliance and safety.
Electric or Gas Connections
When installing a tankless water heater, one of the first decisions you need to make is whether to use electric or gas connections. This choice will depend on various factors, including your home’s existing infrastructure and your personal preferences.
Electric Connections:
If you choose to go with an electric tankless water heater, you will need to ensure that your home has the necessary electrical capacity to power it. It may require a dedicated circuit breaker and a higher voltage outlet. Additionally, you will need to ensure that the electrical connections are installed correctly by a qualified electrician.
Gas Connections:
For a gas tankless water heater, you will need to have a gas line installed to connect it to your home’s gas supply. This may require the services of a qualified plumber to properly install the gas line and ensure that it is up to code. Gas tankless water heaters also require proper ventilation to safely remove combustion gases, so you will need to consider this when planning the installation.
Step-by-Step Installation:
No matter which type of connection you choose, the installation process for a tankless water heater will generally involve the following steps:
| Step 1: | Turn off the water supply to your home and drain the existing water heater. |
| Step 2: | Mount the new tankless water heater on a wall, following the manufacturer’s instructions. |
| Step 3: | Connect the necessary water lines to the water heater, ensuring they are properly sealed. |
| Step 4: | Connect the electrical or gas connections, following the appropriate safety guidelines and local codes. |
| Step 5: | Securely mount the venting system for gas tankless water heaters to ensure proper ventilation. |
| Step 6: | Turn on the water supply and test the tankless water heater to ensure it is functioning correctly. |
Following these steps will help ensure a successful installation of your tankless water heater, whether you choose electric or gas connections.
Testing and Adjusting the Tankless Water Heater
Once you have successfully installed your tankless water heater according to the guide provided, it is important to test and adjust the settings to ensure efficient and reliable operation.
Before testing the heater, make sure you have properly connected all the necessary water and gas lines. Check for any leaks and ensure that the unit is properly grounded.
To test the water heater, turn on a hot water tap and wait for the water to flow. Make sure the heater is heating the water to the desired temperature. If the water is not getting hot enough, you may need to adjust the temperature settings using the control panel or buttons on the unit.
It is also recommended to test the unit’s pressure relief valve. This valve is designed to release excess pressure and prevent the tankless water heater from exploding. To test the valve, turn off the power and water supply to the heater, then lift the valve manually. If water flows out of the valve, it is working properly. If not, you may need to replace the valve.
Additionally, consider testing the unit’s flow rate and adjusting it to meet your specific needs. The flow rate determines how much hot water the tankless water heater can deliver at once. If you find that the flow rate is too low for your needs, you may need to install a larger unit or adjust the settings to increase the flow rate.
Remember to read and follow the manufacturer’s instructions for your specific tankless water heater model for proper testing, adjustment, and maintenance procedures. Regular maintenance and testing will help ensure that your tankless water heater operates safely and efficiently for years to come.
Maintenance Tips for Tankless Water Heaters
Once you have successfully installed your tankless water heater using the step-by-step guide provided, it is essential to keep up with regular maintenance to ensure its optimal performance and prolong its lifespan.
Here are some maintenance tips to help you maintain your tankless water heater:
1. Flushing the System: Over time, mineral deposits and sediments can accumulate in the heat exchanger of your tankless water heater. Flushing the system periodically will help remove these deposits and prevent any potential blockages. You can follow the manufacturer’s instructions on how to flush your specific model.
2. Checking the Pressure Relief Valve: The pressure relief valve is an important safety feature of your tankless water heater. It helps release excess pressure in the system. Regularly check the valve for signs of leakage or malfunction. If you notice any issues, it is best to consult a professional to inspect and replace the valve if necessary.
3. Cleaning the Air Intake Filter: Tankless water heaters have an air intake filter that prevents dust and debris from entering the system. It is important to clean this filter periodically to maintain proper ventilation and avoid any airflow restrictions. Consult the manufacturer’s instructions for guidance on how to clean the filter.
4. Inspecting the Venting System: The venting system of your tankless water heater is responsible for removing combustion gases safely. Inspect the venting system regularly to ensure it is free from obstructions or damage. Remove any debris or blockages that may hinder proper ventilation.
5. Professional Servicing: While you can perform basic maintenance tasks on your tankless water heater, it is recommended to have a professional service the unit once a year. A professional technician can perform a thorough inspection, identify any potential issues, and ensure the system is functioning optimally.
By following these maintenance tips, you can keep your tankless water heater in excellent condition and enjoy a reliable and efficient supply of hot water for years to come.
Q&A:
Is it difficult to install a tankless water heater?
Installing a tankless water heater can be a complex process and requires some experience with plumbing and electrical work. It is recommended to hire a professional to ensure proper installation.
What are the benefits of a tankless water heater?
There are several benefits to installing a tankless water heater. They provide hot water on demand, saving energy and reducing water wastage. They also have a longer lifespan compared to traditional water heaters and take up less space.
What factors should I consider before installing a tankless water heater?
Before installing a tankless water heater, you should consider the size and capacity of the unit to ensure it can meet your household’s hot water needs. You should also check if your home’s electrical and plumbing systems are compatible with a tankless water heater.
How much does it cost to install a tankless water heater?
The cost of installing a tankless water heater can vary depending on various factors such as the size and capacity of the unit, the complexity of the installation, and the region where you live. On average, installation costs can range from $1,500 to $3,000.